

A in-depth tutorial about how to create your own three wheels Holonomic Robot using LEGO Mindstorms EV3 and a bit of Maths knowledge. An holonomic robot is a robot that can move on any direction and even rotate over itself while moving.
Do you want to create a holonomic robot? Well, let’s me explain what it is and why you should care, then I explain you how to design it and finally how to build it.

What is an holonomic robot
An holonomic robot usually refers to a robot using holonomic wheels like Omniwheels. A standard wheel can only be moved forward or backward but in any case the wheels could be moved to the sides.
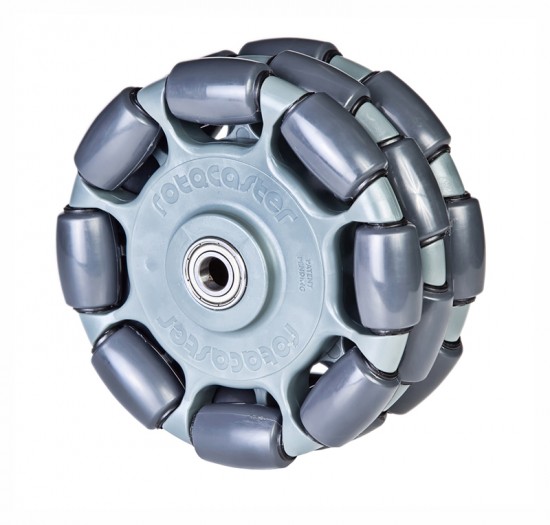
An holonomic wheel on the other hand can be moved forward and backwards and it allows side displacement. This fact allows the robot to move sideways without any kind of rotation.
Why are holonomic wheels important
These wheels are important because they are mounted much an standard wheel instead of being mounted vertically like a castor wheel. This allows the robot to be stronger and resist more weight. The other application is for robots that must move on a very small space.
Also there are applications where it is important to keep the robot always facing something, and for this task the holonomic drive is invaluable.
Also it is important because it is amazingly cool.
The Theory behind a Three Wheels Holonomic Robot
All the math ( and physics ) that I do here are for a three wheels robot but you can easily extends the idea to a four wheeled holonomic robot. In fact I maybe do it later.
A four wheels holonomic robot is easier to design because all the math gets really simpler but three wheels is cheaper :)
So let’s define our problem. We have a three wheels robot called 3W-HR ( to make it personal… it is always easier to curse something by its name ). Our robot is operated with three Large motor that turns each wheel forward or back. The wheels are placed on the robot so that the distance between them is the same and the angle between each wheel is also the same.
Ok? So you are going to need a bit knowledge of vectors, matrix operations, trigonometry and a bit of coffee.
So our problem is how much to turn each wheel so that the robot moves forward, back or to the sides. On a normal wheels robot this problem is pretty much trivial because you move wheels forward to go forward but unfortunately it is not so simple on a three wheels robot.
Watch this video where I explain the process and then continue reading…
Ok, so you see the robot.
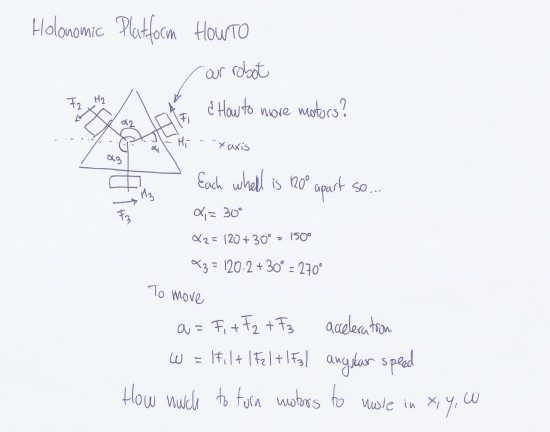
If it has three wheels the simplest way to build it is by creating an equilateral triangle. Each motor should by placed on the middle of the triangle side.
Now, decide which corner of the triangle will point forward. So the angles for each motor M1, M2 and M3 would be α1, α2 and &alpha3;. As you can see in the drawing, we can deduce that α3 is 270 degrees and so we can know α1 that is 30 degrees and α2 that is 150 degrees.
So to move our robot we need apply a rotation to the wheels that will generate a force forward to backward of each wheel, that would be our acceleration that it is the result of adding the forces F1, F2 and F3.
That very same forces will generate a angular acceleration on the robot that it is the same that the magnitude of the force.
As we are interested in moving our robot in the x,y plane, we need to know how much we need to rotates the wheels to move in x,y ω. Still there? Now comes the fun part :)
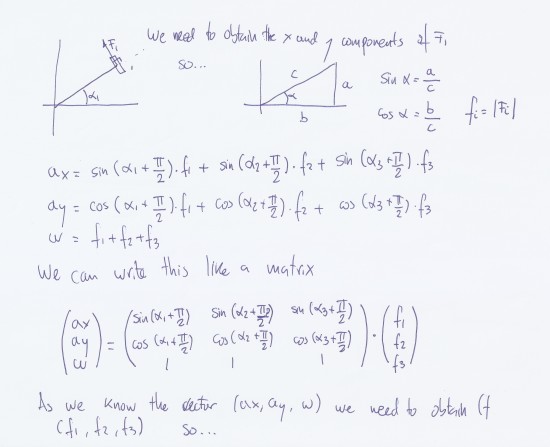
Ok, let’s take one wheel. So we have an α1 angle with respect to the x-axis and a F1 force from a point distant r from the 0,0 reference, the center of the robot. As the radius is the same for all the wheels we can safely ignore it. So we need to turn F1 into its F1x and F1y components. And we will use trigonometry for that.
If you recall the definition of sin(&alpha) you will remember it was the result of dividing c by a. And as the force we are applying with the wheels is perpendicular α we have that
a = sin(α1 + π/2) * f1
That will return a that is the y component of the force ( in the whiteboard the expressions are changed but it really don’t matters that much, you can correct later on the code changing x and y ).
The x component of F would be
b = cos(α1 + &pi/2) * f1
So the resulting components of the F would be
ax = cos(α1 + π/2) * f1 + cos(α2 + π/2) * f2 + cos(α3 + π/2) * f3
ay = sin(α1 + π/2) * f1 + sin(α2 + π/2) * f2 + sin(α3 + π/2) * f3
(Yep, the image is wrong but it will just change x for y axis movements )
Finally ω would be
ω = f1 + f2 + f3
On most cases you really want ω to be zero so the robot doesn’t rotate over itself.
Ok. Still there? We can express the above equations like a matrix
( Look the draw please )
So we know ax, ay and ω and we want to obtain f1, f2 and f3… so… we need to compute the inverse matrix of the big 3×3 matrix so we can our answers. If you use Gauss method for inverting the matrix it is quite trivial to obtain it .
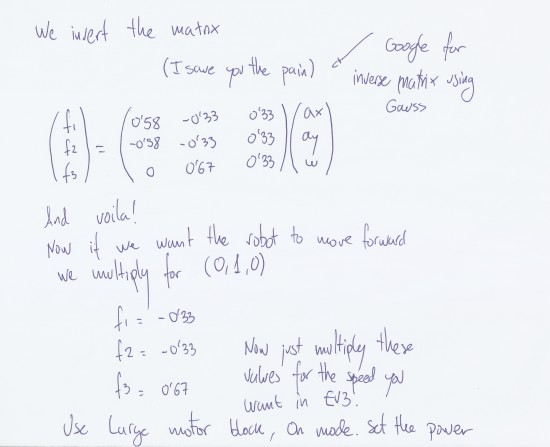
So our final matrix would be like…
And this is the matrix we are going to implement in our code.
Build your holonomic Robot using LEGO
Ok, now we have to build the holonomic platform. So to do this I just draw a triangle with 15M beams and tried to make things work.

As with almost anything moderately complex in LEGO Digital Designer there are parts that works in real life but that can’t be connected in LDD… Here is the model with all the parts.
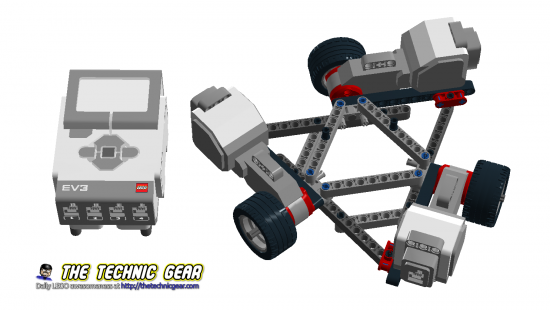
You need to obtain the holonomic wheels or omniwheels from somewhere or build ones yourself… but I think it would be even more expensive than sourcing one from any online shop.
Here is the PDF instructions and the LEGO Digital Designer file.
[sociallocker]
 LXF File for Holonomic 3-Wheels Robot
 PDF Instructions for Holonomic 3-Wheels Robot
[/sociallocker]
Source code for your 3 Wheels holonomic robot
As you can imagine the hardest part of the Holonomic robot is the software implementation to make it move, so I provide three program inside. A square patrolling robot, a beacon tracking and a remote controlled holonomic platform.
Let’s explain each one. First to keep a small sanity of mind I created a My Block that gets three params ( x, y and ω ) and move the motors.
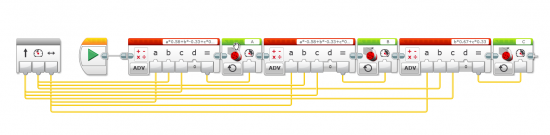
Crazy, isn’t it? This is just the implementation of the above matrix but really EV3 graphical language doesn’t make it any easier to write it.
You can download the source code from here:
[sociallocker]
 EV3 Source Code file
[/sociallocker]
So let’s see the examples.
Square patrolling holonomic robot
The very first example is perhaps the simplest one: a square patrolling robot.
The first thing that you have to understand is that an holonomic Robot works by slipping on the ground so you can’t measure how long you moved or how far you turned using the motor rotations.
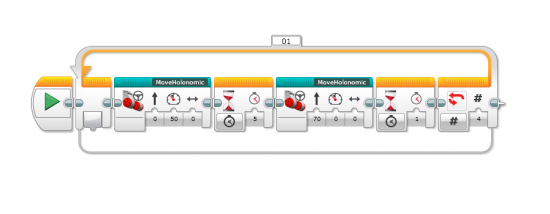
So as you see the program is just a loop that moves the robot to the side during five seconds, then it rotates the robot during one second ( I found this one by trial and error ) and then repeat the whole thing four times. If your wheels are good the robot should end the same place that it began.
Beacon tracking holonomic robot
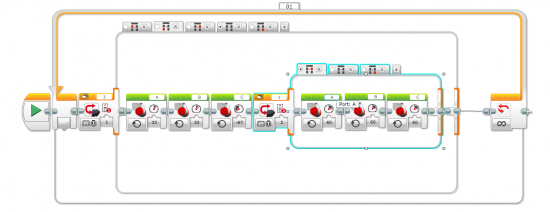
Ok, I am really anxious about creating my own RoboCup player so I have been already playing with the idea of beacon tracking.
So although it isn’t the simplest way of beacon tracking I coded it for the holonomic platform.
![]()
It is a really simple ( and stupid ) program. We just get the heading information from IR Sensor block and then we turn using a Proportional controller towards the beacon. When the robot is close to the beacon it will say Detected and finish the program.
Remote Controlled Holonomic Robot
This is the first program that I write using the IR Sensor as a remote control…
… and I have to say that I am slightly disappointed with it. I understand that the graphical language EV3 uses doesn’t really support cool stuff like events but… it is a pain in the ass to track only the press of the button. As far as I know there is no way of knowing which button was released ( easily ).
So on each press button I had to add a second IR sensor switch to control the second remote to rotate the robot.
Miguel says…
It has been a delightful experience to build this robot. Personally I am not that good at Maths or Physics, so it has been a challenge for me to refresh all that stuff that I once studied and never used anymore.
What do you say about a four wheels holonomic robot? If there is enough interest I can build it and explain much like this one. Just drop me a comment.
Pingback: Como construir tu propio robot holonomico de tres ruedas
Great work there!!
4 wheel would be great too
Thank you for the LDD and programme. I’ve learned how to build a holonomic wheel.
Pingback: Triplex – an holonomic robot – O Falcão
A four-wheel version would be very interesting!
Hello I have a question regarding sideways movement. My tri omniwheel bot doesn’t go right or left properly it always takes a curve can you please help me
Lovely!
You did great job. But my english skills are so bad, that it’s realy hard to understand you. I have question. There are 3 parameters in your ev3 block. What they’re meaning?
Epic Bro!
Hi! İt is great content but I can’t download above program which is unlock. Can you fix it?