
LEGO Trains are lovely. Their tracks are lovely, but I really miss the possibility of making several levels circuits ( btw check this Top 10 LEGO Trains list). At first, being new to LEGO, I though that maybe there was a special part to create slopes much like the one that exists for LEGO Duplo. But it looks like there isn’t.
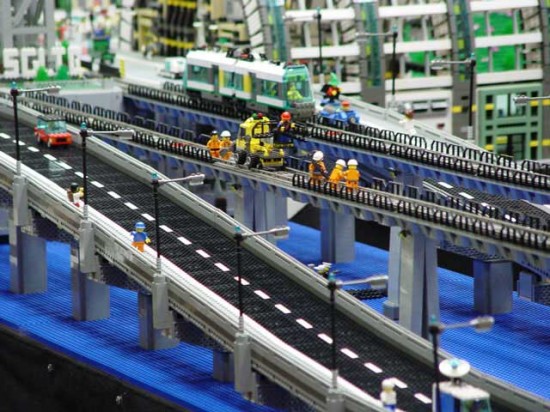
Someone show me a train diorama with several levels where the inclines were created with the ground that was done with some kind of sintetic material and the LEGO tracks simply lay over it. It was nice, but I want to buld my slopes out of LEGO bricks.
So here it is how I did it.
First attempt
So, being an engineer myself…, the first thing I do was built directly without any plans or measures, just using common sense and LOTS of LEGO Tracks.
Yes, it works but I wasn’t happy at all with the result. If you notice the track isn’t continuos and it has bumps that make the train jump and the downside of the incline was too step so the train gets too much speed.
Second attempt
So, time for a bit of maths. Let me show you the video and I explain later what I did and how I did.
Ready? It is nice but still you see the train derails on corners and takes a bit of problem climbing. Here it is all the HOWTO and then I explain you a few tips to make it work.
Inclines 101: The HOWTO
There are two concepts that we really want to apply to our inclines building technique: continuity and incline angle. I promise to be light and readable.
Continuity
We don’t want huge changes in the slope because it would add dangerous bumps into the track that will surely make our train derail… and trust me that you don’t want to kill all those innocent LEGO minifigs
 .
.
So the slope has to change slowly. Using the LEGO System we have two different measures, the brick and the plate, were three plates are one brick. So the only way to do a smooth transition is using at first one plate, two plates and finally one brick on the three first tracks… and keep that method for the rest of tracks… too many tracks don’t you think? So this introduce us the slope angle.
Slope Angle
Now we have to define how step is our incline. The higher the more difficult would be for our train to climb it. I have been told on several forums that I should just add another motor to the train and problem solved… that’s one way, the other is just use more tracks and make the angle smallers.
Conventional trains must not travel on slopes bigger than 3%, that’s means that the train should never climb more than 3 metres vertical each 100 meters horizontal.
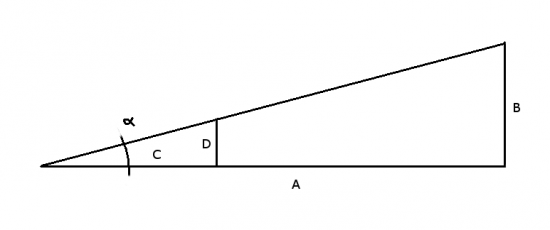
To know the angle you just need to compute the arctan of B/A. Personally, I decided that the angle approach was pointless as I wasn’t able to use 60 straight tracks to get my train up and down… so instead I just decide that I want to climb 12 bricks high using 16 straight LEGO Train tracks. If you see the above diagram you will see that it is pretty straightforward to compute how tall each track must be. It is just constant to (A/B)=(C/D)
Watch the video of it working and a bit below you have the PDF with all the values and a Excel sheet in case you need to change the values.
Definitive 3rd attempt: Working Train inclines
How high must be the track so another train can move under it?
It really depends on the trains you are using, but a common number is between 14 and 16 bricks tall.
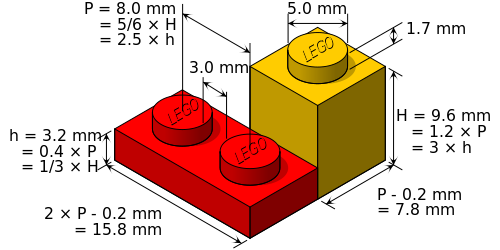
So if you do the basic match, each straight track is 16 studs long, an each stud is 8mm long, while the brick is 9.6mm high so…
To climb 14 bricks with a 3% incline we need…
Right! 35 straight tracks to climb safely to 14 bricks high. No, I am not mad… I don’t have the 4.5 meters needed for this, so even forget about the tracks, you would need 35 to climb and another 35 to go down. That’s the price of perfection…
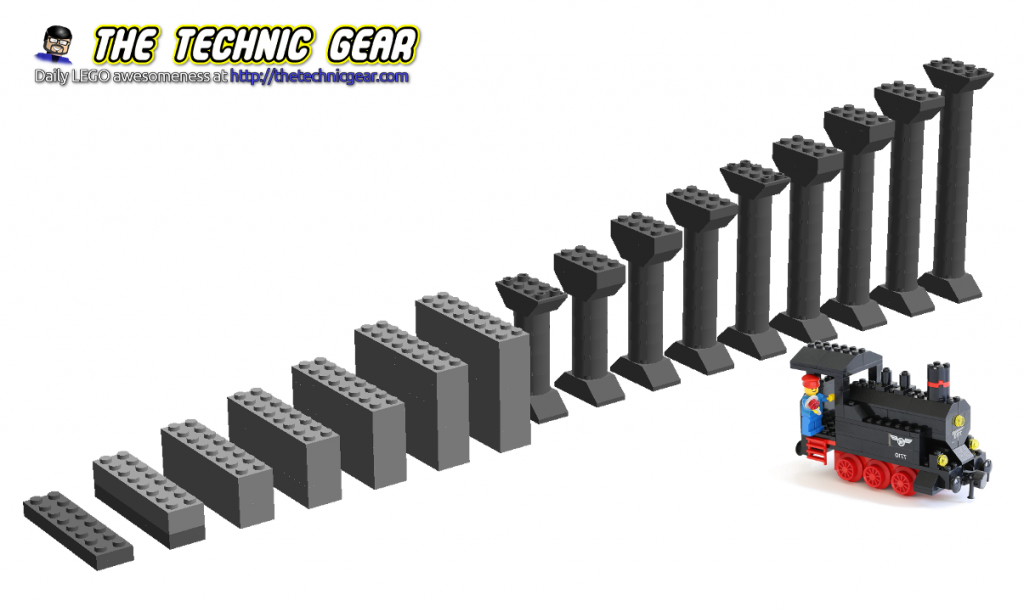
So as you are perhaps as limited by constraints like room and tracks as me, use this Excel sheet. Using the above principles, you just write how many tracks do you want to spend and it will give you the height in bricks and plates of each of the pillars.
I have done a PDF for 12 bricks height and 16 tracks long.

You will save time and mental health if you build two pillars of each height, that way you will have done the up and down inclines.

Keep in mind that you will also need a good amount of LEGO bricks to build the pillars. One option that I have used it making part of them out of LEGO Duplo bricks. You will save lots of bricks that way, although the result isn’t as good.
LEGO Train Inclines Instructions
I built them using the LEGO Digital Designer for climbing 12 bricks of height in 16 tracks. That’s a mean slope of 3.5º.
[sociallocker]
![]() Download Excel sheet for LEGO Train inclines
Download Excel sheet for LEGO Train inclines
Also you can download the PDF here.
[/sociallocker]
Can I use LEGO Curved Tracks to climb?
Yes, in fact that’s what I did on my second approach. But keep in mind that the slope with curved tracks must be even softer than with straight tracks or the train will derail and fall from the track.
Can I use LEGO Switch tracks on an incline?
I haven’t really tried it myself but the accepted agreement here is that no, you need at least one flat track before a switch track or the train will derail.
It isn’t working, what can I do?
When everything else fails just go to The LEGO Shop and order another motor, they are just 12€ each. :)
Hope this little tutorial help you in building multilevel LEGO Train tracks. If you have a question, write it in a comment and I will have a look to it as soon as possible.
If you enjoyed this HOWTO it please share it.
Pingback: Como crear cuestas para trenes LEGO [EN]
Thank you for this article, it is extremly useful. I looked at your Excel sheet and have one question: What is the reason why you use 7.8 in cell E5 and in column B instead of 8 (for 8mm distance between two studs)? (Of course in column B it doesn’t matter, since the 7.8 occurrences cancel themselves out.)
Completely right. I just checked the size of a lego brick and it is 7.8mm but the distance between two studs is 8mm. I will update the excel sheet to show it. Thanks for noticing.
My impression is that even for the width of a brick people usually use 8mm for calculation purposes. The 7.8mm might just be for manufacturing purposes, so adjacent bricks don’t rub onto each other.
Do you have any instructions on how to build the towers please. I cannot find this on your web page. Many thanks.
Do you have a list of parts that could be used to build the pillars ?
Hi Miguel. Thank you for the excellent blog. I successfully created my first stretch of elevated track. Since I had recently spent a small fortune on track, I was able to accomplish this only with straight track. I started with your approach and quickly realized that I may not have enough bricks and plates so I switched to Duplo. Essentially after the 2nd track I increase the elevation by 1 Duplo 2×4 plate (This is the thin plate as opposed to the thick 2×4 which is really 2 small plates). I have a curve at both ends of the inclines. I am currently running the high speed train (60051) on this set up. My challenge is that the train isn’t able to handle the curves after the descent and always derails unless I slow it down. This expected because of the G forces on the train on the curve. I tried to counter the laws of physics by banking the track but it hasn’t helped. Any suggestions? The track is on a carpet but it isn’t a plush carpet.
Thanks again for your wonderful videos. My son and I have spent hours on this and right now I am his favorite person in the world.
Shantanu
Thank you so much for sharing the info.
The thing is, even if you have a 3% average slope, the slope is not perfectly linear. In your example, sometime you add 3 plates height, sometime 2 plates height. Is it made on purpose ? Won’t it be easier to use the same slope angle everywhere ?
Thank you for the article, the maths, and the amazing visual aids! One question, did you try any versions with the tilt-able plates?
Not really.
Can you tell me what are the pieces called that have the pillar bottoms used in the incline? Thank you.
hi , could you please tell me where can i buy those lego parts to build the inclined tracks? thanks
hao912@yahoo.com
Thank you for solving this for me, I really appreciate not having to figure it out myself ; )