
Well, if you successfully installed leJOS using the tutorial then your first steps would be to write a program to do something with it and then you will see the abyss that exists between you and a nice leJOS program. So let’s learn leJOS basics to write our own programs.
Most of the documentation available for leJOS is oriented to Mindstorms NXT and unfortunately the EV3 uses a new API that is going to be the standard in 1.0.0. What that means for you? Well, that unfortunately there are very little options to learn on your own and the samples provided for leJOS EV3 are so complex and with so many hard to follow concepts that you will have a hard time learning from them… so… here I am to the rescue!
Understanding the basic leJOS program
Let’s get back to our Hello World example.
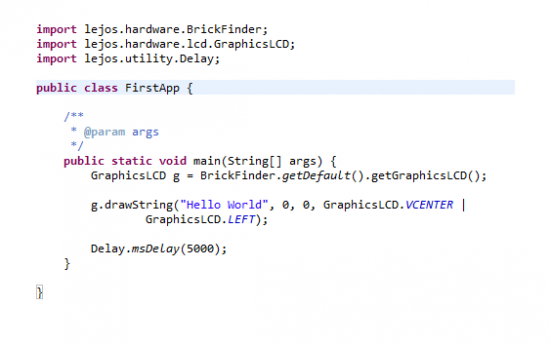
So to create your first leJOS program you need to create a new leJOS project and then create a new Class and make sure it has a main method. Our code is so simple we can directly write the code on the main method, no need for other methods or classes.
So first thing we do is use a helper class called BrickFinder that try to determine if we are running on a EV3 and if not it tries to contact a remote EV3. On case of success it will return an EV3Brick object or an exception if it fails to find an EV3 brick.
So once we have the brick we can access some of it features: buttons, sensor ports or LCD. You could just directly print using System.out.println at this point but it isn’t as exciting… isn’t it?
So once we have the brick, let’s get access to its LCD object and let’s draw a string on the screen.
Got it? Well, let’s do something more interesting. I am going to show you two ways of doing things… one manipulating motors and sensors directly and another way using classes available at leJOS to make your life easier. Personally I think it is a bad ( BAD! ) idea to use the latter directly without really understanding what it is going on. The good thing is that source code is available and you can study them.
Using EV3 Motors with leJOS
The EV3 Set comes with two kind of motors two large motors and one medium motor with more speed but less torque. There are two different class to handle them.
The Large motor is quite powerful and has a 160rpm speed
The Medium motor is smaller and easier to attach to your robot and although it has less torque it is faster.

Also you need to understand that EV3 motors are Regulated. It is not easy to notice this on the EV3 software because all the blocks give no indication about it… but on the advanced blocks there is a unregulated motor block. So what the hell means regulated? You may be aware that your motors have a built-in rotation sensors that can track changes of their position with a precision of up to 1 degree. Well, using these rotation sensors and a PID controller ( pretty much like the line following one ) LEGO coded the blocks to that when you say to a motor to move at 60% of power the motor will move to that power level but if for any reasons it is slowed down ( an obstacle, different kind of floor, more weight ) the block will increase the power given to the robot to make it move to the desired power using a PID controller. The very same thing happens when you ask it to rotate 75 degrees.
So the EV3LargeRegulatedMotor is pretty much the same that the EV3 Large Motor Block. You can check the methods on the EV3 leJOS API but I will show you the most useful.
Interesting EV3 Large Regulated Motor methods
First is the constructor, we need to pass the port to which the motor is attached. So using the method brick.getPort(“A”) we get access to the A port. This is the new way of accessing ports.
EV3LargeRegulatedMotor motor = new EV3LargeRegulatedMotor(brick.getPort("A"));
forward and backward
This class has two methods to make the motor move forward ( or backward ). The speed and acceleration is determine with other methods. So once you call any of these methods the motor will start moving.
motor.foward()
flt and stop
So eventually I am sure you will want to stop the motor and we have two options.
The flt method will stop the current to the motor and will left it floating.
motor.flt()
The stop method on the other hand will actually brake and stop the motor.
motor.stop()
Both methods have an optional boolean parameter immediateReturn. If it is true the method will issue the order and return to its caller ( that it is usually the behaviour you want, specially when you are operation two motors in parallel ), if you skip the parameter or set it to false the method won’t return until the motor is actually stopped and that can take a few hundred of milliseconds.
motor.stop(true)

// do something else unrelated to THIS motor

motor.waitComplete();
rotate
The above methods are perfect but on most situations you want to measure how many degrees your motor moves, and this is the perfect method. It will turn your motor with a precision of +/-1 degrees. And negative degrees works :)
motor.rotate(10)
As with the previous methods, this one accepts an extra boolean parameter to return as soon as the order is issued or wait for the task to complete.
setSpeed and setAcceleration
These methods set the speed in degrees per second and the acceleration. They are really cool because let you implement the ramp up and ramp down operation of motors so you can reduce slippage to the minimum.
Creating a robot that does a patrolling squared route
Please don’t skip this step. Even if you think it is stupid and too simple, give it a try. You will be as surprised as I was when I realized how hard ( impossible? ) to get this right.
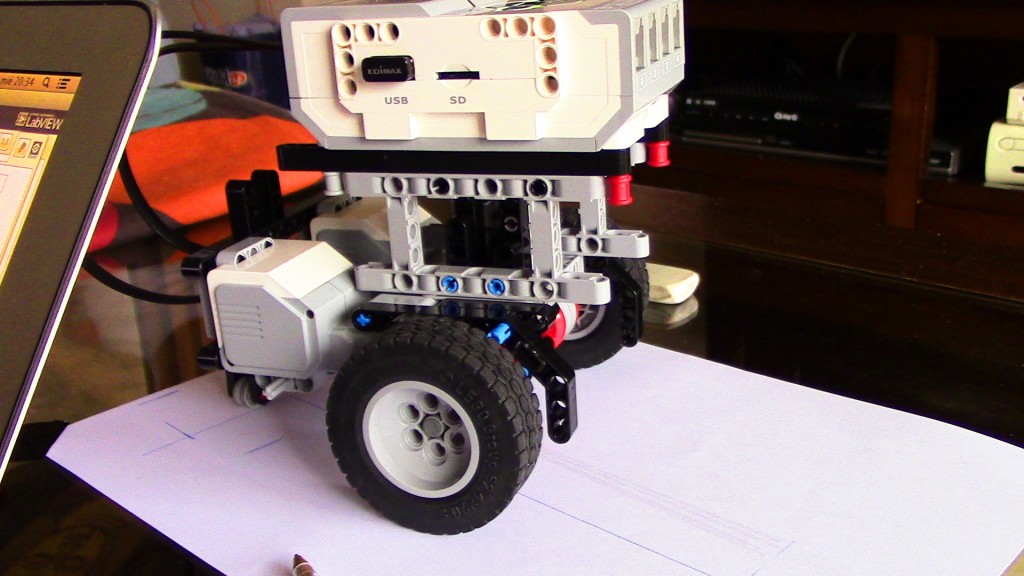
The first step is to build a little robot to accomplish the task, so my advice is to build a differential drive robot much like this.
If you have problems building it, use Simplebot instructions. We are not going to use any sensor in this step.
So, now that we have a robot we are going to make it move over a 50cm square so that it ends on the same position that it started.
Do you want to do on your own? I am here waiting…

Ok, are you back? Did it work? ( drop me a comment and better a photo! )
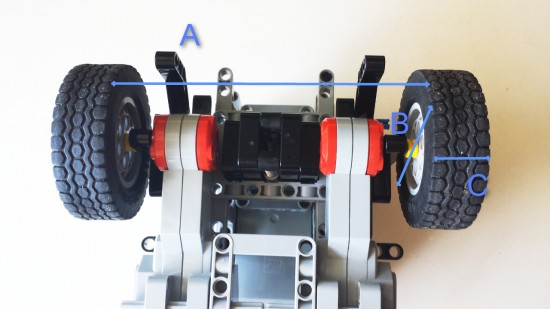
Now get a measuring tape and measure the diameter of your wheels (B), the width of the wheel (C) and the distance between the wheels (A)… much like in this image.
We will use this data to calibrate our robot.
I am going to use two different ways of doing this in leJOS, one is low level, much like EV3 and the other is the simpler way leJOS offers. But before this, let’s see the two types of movements that we need to do in this robot: moving forward and steering.
Moving 50 centimeters forward with a differential robot
This is the easy part of the movement. My robot has a wheels of 6.24 cm diameter so to know how much we need to turn then to move forward we do a simple
Each complete rotation of the wheel means:
distance moved = 3.1415 * diameter
So if we want to move 50 centimetres we need to turn our wheels…
amount of turns = 50 cm / distance moved
And instead of using rotations I prefer to pass degrees to the block so…
degrees = amount of turn * 360
So for my robot this would be
3.1415 * 6.24 = 19.60 cm
50 / 19.60 = 2.55 rotations * 360 degrees = 918 degrees
You can safely ignore the final degrees because EV3 rotation sensors has a precision of +/-1 degree.
If we do this with leJOS it would be like…
/* Move straight the squareSize centimetres */

int degrees=(int)Math.round((squareSize/wheelCircunference)*360.0);

left.rotate(degrees,true);

right.rotate(degrees);
Or using the DifferentialPilot class…
pilot.travel(50);
Rotate 90 degrees on a diferential robot
Ok, we just now need to rotate our robot 90 degrees on each turn to make a square. This is slightly more complex that moving forward but don’t get scared, it is still very simple maths.
As our robot can rotate over a point ( just make each wheel rotate on different directions at the same speed and you will see it ), it will create a cicle of radius around half the track of the robot, the distance between center of the wheels.
distance = track * 3.1415
So distance is how much would the robot has turned when rotation a full rotation but we want to rotate only 90 degrees so…
90 degrees distance = distance / 4
And using the amount of distance run for each rotation from the previous task…
rotations = 90 degrees distance / distance run by wheels
And again we translated this in degrees
90 degrees turn = rotations * 360
Let see the numbers with my robot…
3.1415 * 11.9 = 37.38 / 4 = 9.34

9.34/ 19.60 = 0.476

0.476 * 360 = 171 degrees
You can safely ignore the final degrees because EV3 rotation sensors has a precision of +/-1 degree.
If we do this with leJOS it would be like…
/* Rotate on the spot */

degrees=(int)Math.round((((robotTrack*Math.PI)/4.0)/wheelCircunference)*360.0);
left.rotate(-degrees,true);
right.rotate(degrees);
Or using the DifferentialPilot class…
pilot.rotate(90);
Try it yourself
With the above information you can try it already yourself. But if you prefer you many have a look at the finished programs.
This is the low level motor access program
[sociallocker]
/**
 * This program runs on a differential robot that has 62.4mm diameter wheels and a robot track of 122mm.
 * This robot has a pen on the center of rotation and it will draw a square of 40cm.
 *
 * @author miguel
 *
 */
public class DrawSquare {
  static double wheelDiameter=6.24;
  static double robotTrack=12.2;

  public static void main(String[] args) {
    // Distances and sizes are expressed in centrimetres.
    int squareSize=40;
    double wheelCircunference=DrawSquare.wheelDiameter*Math.PI;

    Brick brick=BrickFinder.getDefault();

    RegulatedMotor left=new EV3LargeRegulatedMotor(brick.getPort("B"));
    RegulatedMotor right=new EV3LargeRegulatedMotor(brick.getPort("C"));

    /* Initialize motors */
    left.setAcceleration(400);
    right.setAcceleration(400);

    left.setSpeed(400);
    right.setSpeed(400);

    for(int i=0;i<4;i++) {
      /* Move straight the squareSize centimetres */
      int degrees=(int)Math.round((squareSize/wheelCircunference)*360.0);
      left.rotate(degrees,true);
      right.rotate(degrees);

      /* Rotate on the spot */
      degrees=(int)Math.round((((robotTrack*Math.PI)/4.0)/wheelCircunference)*360.0);

      // K is a calibration parametrer to turn the robot.
      double K=0.98;
      degrees=(int)(K*degrees);

      left.rotate(-degrees,true);
      right.rotate(degrees);
    }

  }

}
[/sociallocker]
And this one is using the DifferentialPilot class
[sociallocker]
/**
 * This program runs on a differential robot that has 62.4mm diameter wheels and a robot track of 115.5mm.
 * This robot has a pen on the center of rotation and it will draw a square of 40cm.
 *
 * It is done using the DifferentialPilot class.
 *
 * @author miguel
 *
 */
public class DrawSquarePilot {

	public static void main(String[] args) {
		Brick brick=BrickFinder.getDefault();

		RegulatedMotor leftMotor=new EV3LargeRegulatedMotor(brick.getPort("B"));
		RegulatedMotor rightMotor=new EV3LargeRegulatedMotor(brick.getPort("C"));

		DifferentialPilot pilot=new DifferentialPilot(6.24, 11.55, leftMotor, rightMotor);

		for(int i=0;i<4;i++) {
			pilot.travel(40);
			pilot.rotate(90);
		}

	}

}
[/sociallocker]
Integrating and calibration of the differential robot
Ok, are you done? Now comes the fun part. Run your robot.
Surprise! Did it work? I would be quite surprise if it did. So we need to calibrate it so that it work correctly. You will surely have a small error on the forward movement but a big error on the rotation movement. Yes? Why?
The forward movement error can be caused by things like wheels slippage, different terrain , different level and the rotation sensor error but overall it should be quite small, maybe around 1%.
But the rotation movement is almost sure quite wrong. You don’t need any tool to see that the robot is steering a way more ( or less ) than 90 degrees. Why? Because your wheels are wide and you don’t really need where they touch the ground, so we need to calibrate this parameter to get it right. How? Just multiply the amount of degrees by a constant value K… and to guess the value of K you run your robot with different values until you get it right, start with 0.98, does it gets better? So keep going…
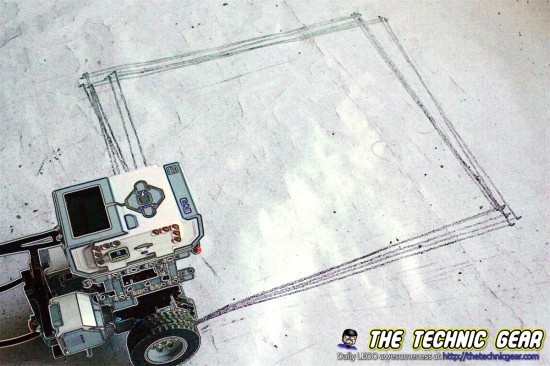
Once you get it almost right you should have something like this.
Ok, you are almost done. Keep calibrating the K param until you get almost a perfect square most of the times. It is the best you can do without any sensor.
Source code for leJOS EV3
Don’t want to write your own code? Download from here the EV3 source code and the leJOS code for both the lowlevel motor manipulation and the DifferentialPilot class.
Here is the EV3 code
And this is the low-level leJOS code manipulating the motors directly and the same program done using a differential drive.
[sociallocker]
Source Code for leJOS EV3 Differential Drive Robot Square patrolling[/sociallocker]
Remember all the source code on The Technic Gear is release as open source GNU GPL 3.0
Take the challenge
If you complete the robot and write or run the programs and calibrate to the best you can… you will realize that there is still an error. So without using any sensor, how can we improve even more the result? Think about it and drop a comment. I will score ideas from 0 to 10.
Miguel says…
Hope you have enjoyed this introduction to leJOS. In the next article we will introduce sensor handling using leJOS. If you have any question, drop me a comment and I will try to help you.
Please, if you enjoyed this article share it with your friends.
Hi,
Nice, blog. Accurate movement using odometry can be tricky! A few comments…
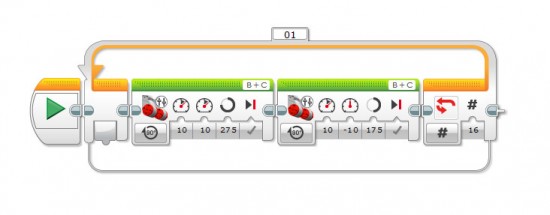
In your example code you recommend the following sequence:
left.rotate(degrees,true);
right.rotate(degrees);
This may introduce an error because there is no certainty that the left motor will have finished when the right one does (particularly when using different numbers of degrees). If you follow this move immediately by another then leJOS will not complete the partial move instead it will blend the two moves together using the current acceleration setting), which is probably not what you want. It is always best to add a waitComplete call to ensure both motors have stopped.
Secondly if you are going to use a variable number of degrees as the target for the two motors (which you may need to do if one wheel has a larger diameter than the other), then you will probably also want to use a different target speed as well (so that both motors stop at the same time). However if you do this remember to also use a different acceleration factor for the two motors, otherwise one motor will reach the target speed before the other.
Finally if you are serious about calibration of a differential drive robot take a look at the following paper:
http://www.valentiniweb.com/Piermo/robotica/doc/Borenstein/paper58.pdf
Oh and if you want another fun way to evaluate the quality of straight line movement, take a look at:
https://www.youtube.com/watch?v=NJ_6Qm_BNFI
Have fun
Andy
Thanks. I will edit the code to use waitComplete… I supposed that left would have ended more or less at the very same time than right ( or the robot won’t be moving at a straight line, isn’t it? ) but it doesn’t hurt to add it.
Reading the paper right now.
Thank you! Thank you! This is just the sort of easy learning steps that I need. I have tried both of the previous LeJOS books with very little success. Maybe this time I will actually learn some JAVA programming. I look forward to further LeJOS/EV3 tutorials. Something I am struggling with is how to get finished JAVA programs/projects into Eclipse.
Hahaha. I am having the same problem between my laptop and my desktop. I will have a look at this and write a little side note about it.
Pingback: HOWTO Calibrate a differential robot: UMBMark Explained ← LEGO Reviews & Videos
Thanks a lot, Miguel!
This helped me to quicker understand the motor control and gave further ideas … You made my day!
Pingback: LeJOS: el teu robot amb Java | Labs